Hardwood is a living substance which reacts to changes in relative humidity. Wood gains and loses moisture before and after installation, as surrounding conditions fluctuate. Indeed, wood expands in the summer when humidity level is high and contracts in the winter when the humidity level is much lower. To minimize the expansion or contraction of your hardwood floor, it is recommended that the building should be well ventilated and the relative humidity level maintained at 45 % all year long. Before you begin, plastering and cement work must be completely dry. It is strongly recommended that the wood be left to acclimatize at house temperature for a period of at least 24 hours at the ideal relative humidity level which is 45 %.
Test concrete slabs for excess moisture
Rubber Mat Method (Useful Only On Light-Colored Concrete)
Lay a flat, non-corrugated rubber mat on the slab. Place a weight on top to prevent moisture from escaping and allow the mat to remain 24 hours; if the covered area shows dark, wet marks, too much moisture is present.
Polyethylene film method
Tape a 12″ (30 cm) square of clear polyethylene film to the slab with plastic moisture-resistant tape, sealing all four edges. If no condensation collects under the film after 24 hours, the slab is dry enough for floor installation.Make tests in several areas of each room. When test indicates excess moisture, wait for the slab to dry naturally or accelerate drying with heat and ventilation, then test again before installing floors.
Installation methods on slab
Plywood-on-slab
Begin by covering the slab with a vapor retarder of either asphalt felt, building paper or polyethylene.
Asphalt felt or building paper
First, prime the slab and apply cold, cut-back asphalt mastic with a notched trowel at the rate of 50 sq.ft. per gallon (1m2 per liter). Allow to set for two hours. Unroll 15 lb (6.8 kg) asphalt felt or building paper, lapping the edges 4″ (10 cm) and butting the ends. Over this, apply a second similar coating of mastic and roll out a second layer of asphalt felt or paper in the same direction as the first, staggering the overlaps to achieve an even thickness.
Polyethylene
When the slab is well above grade and the expected annual rainfall is light to moderate, cover the entire slab with 4-6 mil polyethylene film, overlapping the edges 4-6″ (10 to 15 cm), and allowing enough film to extend under the baseboard on all sides.
When moisture conditions are more severe, prime the slab and apply cold, cut-back mastic with a straightedge or fine-tooth trowel (100 sq.ft. per gallon) (2 m2 per liter). Allow to dry for at least 90 minutes. Unroll 4-6 mil polyethylene film over the slab, overlapping the edges 4-6″ (10-15 cm).
In either cases, roll the film flat or “walk” it in, stepping on every square centimeter to insure proper adhesion. Puncture bubbles to release trapped air.
Install the plywood after the vapor barrier is in place. Loosely lay a nailing surface of 3/4″ x 4″ x 8″ (19 mm x 1.22 m x 2.44 m) exterior plywood panels over the entire area, leaving a 3/4″ (19 mm) space at the wall line and 1/4″-1/2″ (6-12 mm) between panels. Cut plywood to fit within 1/8″ (3 mm) near door jambs and other obstructions where finish trim will not be used. Lay plywood diagonally across the direction of the finished floor to help prevent cracks along panel edges.Fasten plywood to the slab with power-actuated fasteners, securing the center of the panel first, the edges, using nine or more nails.
Fasten plywood to the slab with power-actuated fasteners, securing the center of the panel first, the edges, using nine or more nails.Do not use power-actuated fasteners or concrete nails when radiant heat pipes are imbedded in the slab. Instead, cut the plywood into 4’ x 4’ (1.22 m by 1.22 m) squares, score the backs 5/8″ (16 mm) deep on a 12″ x 12″ (30 cm x 30 cm) grid, and lay the panel in cut-back mastic applied with a 1/4″ x 1/4″(6 mm x 6 mm) notched trowel. (35 sq. ft. per gallon) (0.7 m2 per liter).
Screeds System (sleepers)
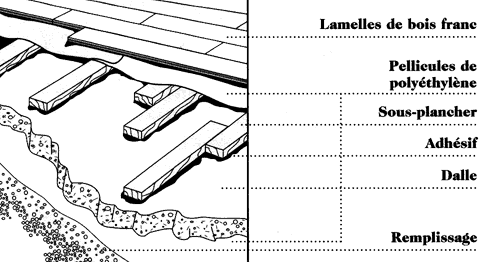
Flat, dry, perservative-treated 2″ x 4″ (5 cm x 10 cm) screeds in random lengths from 18″ to 48″ (0.5-1.2 m) can also serve as a subfloor.
Begin by sweeping the slab clean, applying an asphalt primer and allow to dry. Apply hot (poured) or cold (cut-back) asphalt mastic and imbed the screeds. Stagger joints and lap ends at least 4″ (10 cm) and leave a 1/2″ (12 mm) space between lapped edges. Be sure there is enough mastic for 100% contact between screeds and slab. Leave a space of 3/4″ (19 mm) between ends of screeds and walls with a continuous run of screeds at end walls.
Before installing the floor, loosely lay an additional vapor retarder of 4-6 mil polyethylene film over the screeds, overlapping the edges on top of the 2 x 4s. Avoid bunching or puncturing the film, especially between the screeds. Nail the finished flooring to the screeds through the film.
Preparation
For new construction or renovations:
Be sure to maintain occupancy-level temperature and humidity for at least five days. The house must be heated at 22°.
Using a hygrometer, verify the subfloor (plywood) humidity level; it must not exceed 12 %. If the humidity level is too high, turn up the heat and open the basement windows 1/2″ (1.25 cm).
Remove baseboards and door sills.
Screw the subfloor securely and if necessary, install a double layer of 15 lb (6 kg) or a single layer of 30-lb (14.5 kg) asphalt felt or building paper.
Using a handsaw, slit the bottom of the door-frames 3/4″ (2 cm) in order to slide a hardwood plank beneath the door.
Tools and material required
Hardwood floor nailer (with rubber mallet)
Electric drill and bits
Tenon-saw, circular saw or handsaw
Claw hammer and nail punch
Measuring tape
Before you begin, it is important to verify the working condition of the hardwood nailer to prevent damage to the planks.
Step by step installation
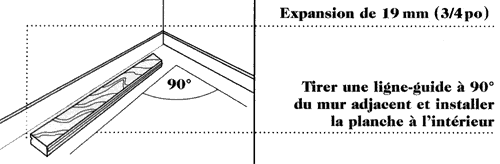
Using the chalk line, draw a line parallel to 3 1/2″ (25 mm) larger than the planks width. Never nail closer than 3″ (75 mm) towards the end of the plank.
Select the planks, then lay them out on the floor in the general pattern in which they will be installed. The straightest planks should be used for the first and second rows.
Always select your planks with care. Those with flaws must be recut.
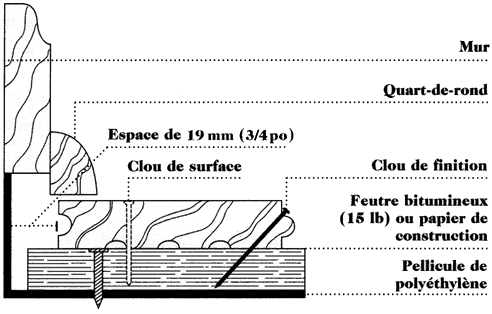
Lay the tongue edge of the plank on the guideline, leaving a 3/4″ (19 mm) space between the groove edge and the starting wall. This expansion space will allow the wood to expand if necessary.
The first row must be secured to the floor using screw shank flooring nails. Drill holes on the surface of the planks at 1″ (2.5 cm) from the edge approximately 12″ (30.5 cm) apart. Next, secure using a claw hammer and punch.
Measure and cut a plank the required length to finish the first row. As the remaining section will be used to start the second row, the plank selected for the first row must be long enough to yield a remaining section of adequate length. Leave a 3/4″ (19 mm) space between the wall and the plank in each row.
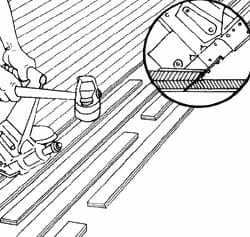
Start the second row with a plank of at least 6″ (15.2 cm) shorter or longer than the plank used in the first row; this will avoid aligning the joints. Set the plank in place, drill a hole on the tongue edge at a 45° angle, then nail at every 8″ (20.3 cm) or 10″ (25.4 cm).
The subsequent rows must be installed in the same manner, but using a hardwood floor nailer. Try a few hammering tests on a piece of scrap wood to determine the pressure needed to properly drive nail.
For best appearance, leave enough distance between the joints by alternating with planks of different lengths to avoid aligning joints.
The last four or five rows must be installed in the same manner as the first two rows. The use of the hardwood floor nailer is impossible since the last rows are too close to the wall.
Conceal the nail holes using a special wax.
Finish trim is nailed only to the wall and never on the planks.